Video Tutorials for the TekBot
The index links to snippets which may provide visual cues for assembling the TekBot. These clips may be helpful as references at home or in the classroom but the information presented in the movie clips is not meant to be all inclusive.
- Components (5 Stills-TekBot kit 1,wires 2, resin 3, instructions 4, soldering iron 5)
- Wire Stripping (wire strip 6)
- Twist Wire (wire twist practice 7)
- Solder Example (solder example 8 and solder example 9)
- Wire Separation (start wire pull 10, finish wire pull 11)
- Shrink Tubing (shrink tubing 13)
- Shrink Wrapping (fit shrink wrap 14, shrink wrap 15, finished shrink 16)
- Frame & Motors (frame/install motor 18, installing motor 19, more installing 20, still more installing 21, motors installed)
- Battery Box Installation (battery boxes 22)
- Wiring the Battery Boxes (wiring boxes 23)
- Battery Leads (battery leads 24)
- Attach rollerball (roller ball 25)
- Attach Wheel (attach wheel 27)
- Wire Strip (pretend wire strip 29)
- Connector as holder (using connector as holder 30)
- Connector Tinning (tinning a connector 31)
- Attaching a connector (attach connector 32)
- Parts Layout (parts layout 34, diodes 34, kit 36, power supply board 37)
- Component (inserting first component 38)
- Resistor (resistor in place 39)
- Soldering (soldering 40, finishing touch 41)
- Volt Meter (volt meter 42)
- Charger Board (Hold board to light to see connectors 43)
- Continuing assembly (See the general layout. 44)
- Capacitor (placement and soldering capacitor. 45)
- Finishing touches (Finishing 46)
- Connectors next (connectors 48)
- Trimming the leads (trimming 49)
- Connectors (connectors 50)
- Counting pins for the connectors. (counting 51)
- Plug into the outlet (plugin to AC 52)
- Plug into the adaptor (plugin 53)
- Test the motor and connections (test 54)
- Overview of the TekBot (overview 61)
- Side view of the TekBot (side view 62)
- Another side view of the TekBot (sideview 63)
- Top view (topview 67)
- Remote wiring - power to motors. (remote wiring 70)
- Breadboard plug-in (breadboard plugin 73)
- Connect to ground (connect to ground 74)
- Bump Sensor (bump sensor 80)
- Close up of the sensor board (closeup of board 82)
- Close up of the potentiometers (close up of pots 85)
- Finished TekBot (Finished version of the Optimus 87)
Testing Runs for the Optimus:
- TekBot - One of the first runs (run 88)
- A green reminder (green is for ground 89)
- Trailer hitch (The hitch is for towing! 90)
- Optimus tows a trailer (towing 92)
- A sensor test with the trailer (test 2 97)
Roger and his TekBot showing 'velocity', 'driving on the wall', 'driving on an inclined plane'.
Acceleration with a pair of Hot Wheels
- Hot Wheels running on a measured track. (The marks are 85 millimeters apart. 76)
- Conclusion of race. (Cars are stopped. 77)
Acceleration with a TekBot
- Optimus leaves the starting gate and the spring slows the motion to a stop. The marks on the ruler are 85 millimeters apart. (Acceleration with Optimus 99)
- Optimus leaves the starting gate and the spring slows the motion to a stop. Camera is panning. (The spring causes acceleration. 100)
- Optimus leaves the starting gate and the spring slows the motion to a stop. Camera is still. (101)
- The attached spring is stretched. (102)
- The wheels slip and Optimus stops. Why? (103)
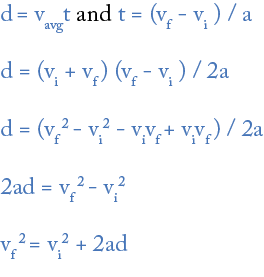
Algebraic derivations for 'acceleration'. (PPT)
- Using "distance equals rate times time" and the definition of acceleration, we arrive at an expression for "Final Velocity".
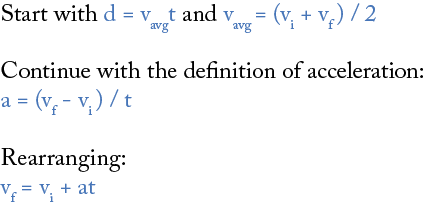
- Substitute in for 'average velocity' and 'time'; we arrive at 'distance equals one half acceleration times time squared'.

- The equation involving 'Final Velocity Squared' allows us to use an acceleration expression without using 'time'.